Verifications
Send a verification link
Email your client a verification link from New Verification. On a client-pays check you are not charged.
Updated 6 October 2026
A verification starts when you email your client a link. You do this from New Verification. The page subtitle reads Send your client a verification link. Free for you — your client pays.
When your client pays, they choose Individual (KYC) or Company / Trust (KYB) on the link. You do not pick that type on the send form. An individual check is $20. A company, trust, or SMSF check is $40. The identity document and liveness steps happen after payment, on the pages of our identity verification partner, Personr.
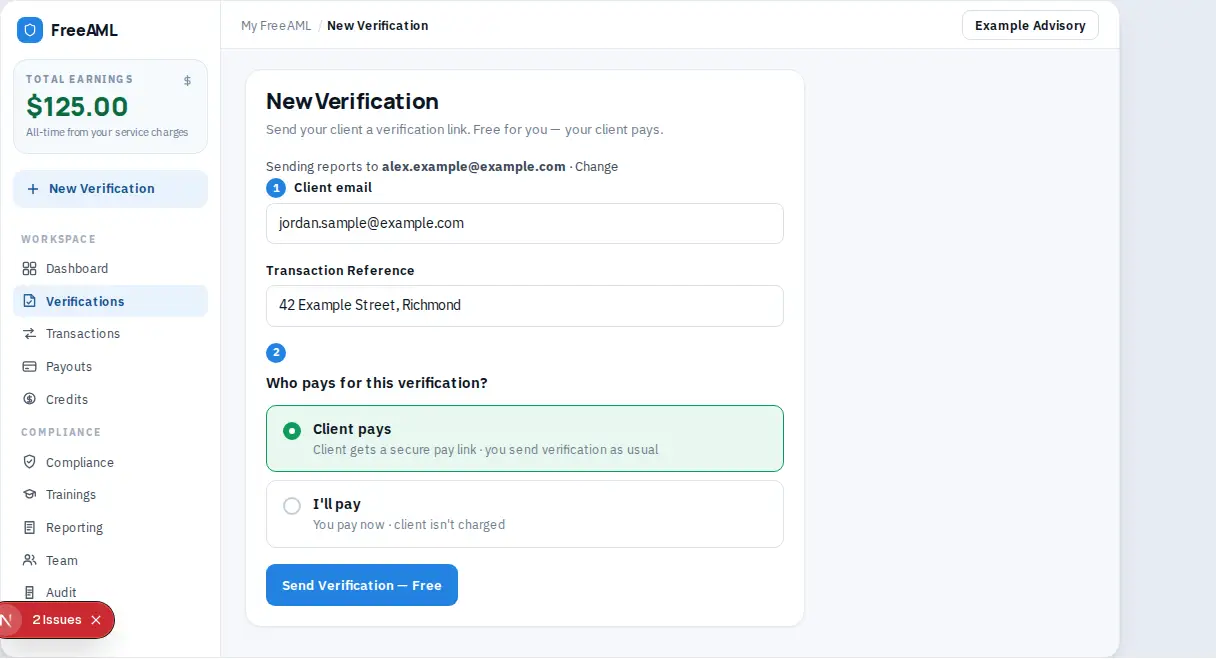
Send the link
- 1
Sign in, then select New Verification in the sidebar.
- 2
Check Sending reports to your email. Select Change if that address is wrong.
- 3
Enter Client email. Use an email address. FreeAML emails the link.
- 4
Add a Transaction Reference if you want one, for example a matter or property. The helper says this links the verification to your transaction for audit purposes.
- 5
Under Who pays for this verification?, leave Client pays selected when your client will pay. The card says Client gets a secure pay link · you send verification as usual.
- 6
Select Send Verification — Free. The button reads Processing... while it sends.
- 7
You open the verification and see Verification sent successfully. Waiting for Client.
The footer of the form says No charge to you · Client pays verification costs securely with our payment provider when you have not added a service charge.
What your client receives
The email subject is Identity Verification Required - FreeAML. On a client-pays check the button in the email is Pay & Verify.
Part of the check happens on FreeAML. Part happens on Personr's secure page.
On FreeAML
- 1
Your client opens the email and sees Identity Verification Required.
- 2
They choose Individual (KYC), I'm verifying myself, at $20, or Company / Trust (KYB), Verifying a business or trust, at $40. A service charge you set is included in the price they see.
- 3
They check the amount and select Pay & Verify →. Card payment is taken on Stripe's secure checkout. They come back to FreeAML, which shows Processing Payment.... If your client does not want to go ahead, they can select I don't want to complete this verification on the payment page.
- 4
On Before we begin they tick the consent box and select Continue →.
- 5
For a company, trust, or SMSF they enter Entity Name and ABN or ACN on Entity Details, then Continue. For a personal check, FreeAML shows Setting up your verification....
- 6
FreeAML shows All done! Redirecting... and You'll now complete your identity verification.
On Personr's pages
- 1
The browser moves to Personr's secure page. The web address changes. The page shows "Powered by Personr". That is expected.
- 2
For a personal check, Personr asks your client to pick the issuing country and type of identity document, take photos of it with their camera, and complete a liveness check. A liveness check is a selfie-style check using their camera.
- 3
When they finish, Personr starts processing on its own. Most personal checks take a few minutes.
You get the result by email and on the verification. If your client closes the page part way, they can open the same FreeAML link again. After payment it takes them straight back to Personr's page.
What does the client email field accept?
An email address. The placeholder is name@example.com.
Can I send the link before I sign in?
The form can ask for your email and a code first. After that it sends the same way. Signing in first keeps the verification on your dashboard.
Which ID can my client use?
Personr's pages ask for the issuing country and document type, such as a passport or a driver licence. Which documents are accepted depends on the issuing country. FreeAML does not list them.
Does my client need a camera?
Personr's pages use the device camera for the document photos and the liveness check. Personr supports all device types and modern browsers.